I spent my long summer holidays in a small apartment by the sea with my parents, my
sister and both of my grandmothers.
I was one of those kids who was sitting by the constantly crocheting grandmothers and eventually I learned how to crochet. I suppose that even then I loved it as it made me feel relaxed and till today there really is nothing as blissful to me as a cosy indoor nook, and a lapful of yarn.
I had in mind working on a scarf for my husband a long time ago as I have never made anything for him. I believe that it's an easy pattern and I hope you will find it a great idea for a gift for the men in your life!
-Get the ad- free ,large print, printable PDF pattern on my Etsy shop
- Pin this pattern to your Pinterest boards for later here-
Add this pattern to your Ravelry queue here
Materials needed
Needles -US size 10,5 (7 mm)
Yarn: I used: 2 skeins of
STYLECRAFT SPECIAL ARAN
100% premium
acrylic
196m (214yds)
Read Heart Soft is a very good choice as well
Gauge
14 sts x 20 rows =3,93” x 3,93” (10x10cm) square
Measurements of finished scarf
12.2 inches (31cm)
width
63 inches (160cm)
length
Abbreviations in US terms:
CO: cast on
K: knit
P=purl
Yo: yarn over
Bo= bind off
RS=right side
WS=wrong side
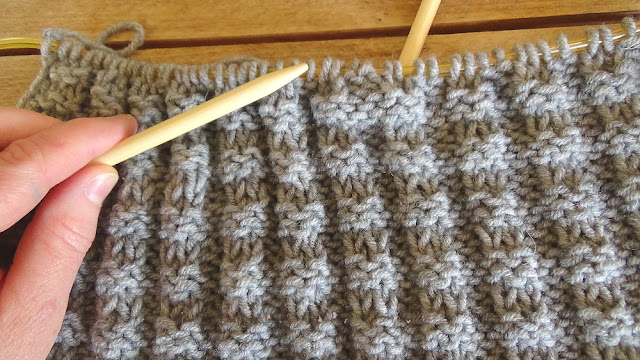
*This pattern creates a right side and a wrong side, slightly different. The 2 sides are very similar so in a way it’s almost a reversible scarf.
 |
| Right Side |
 |
| Wrong Side |
Note:
-the basic pattern requires a multiple of 4+2 sts,
-I added 8 sts more in this multiple.
- 4 sts at the beginning and 4 sts at the end of the row to create a
border of Garter stitch. This is optional, you may skip this or follow it. To
match this side border, I started my scarf knitting in Garter st for 10 rows,
to create a border and I finished the scarf knitting 10 rows in garter stitch
as well, so a border goes all around the scarf. Again, you may follow this or
not.
PATTERN
CO 50 sts ( 42 sts for the basic pattern and 4+4 sts for
the border)
If you want a less wide scarf, CO 46 or 42
If you want a more wide scarf CO 54 or 58
Row 1: Knit all sts
Repeat row 1 for 9 more rows
Note : the pattern is a 4 rows repeat
Note: I slip the first st of every row, purlwise to
create a tidy edge(
with the yarn in front , slip the first st without knitting it, put the yarn to
the back and continue knitting the next st)
Row 11: Knit all sts
Row 12: K4, purl all sts
until you have 4 sts left, K4
Row 13: K4, *K2, P2*, repeat
until you have 6 sts left, K2, K4
Row 14: K4, *P2, K2*, repeat until you have 6 sts left, P2, K4
Repeat rows 11-14
until desired length, a scarf 62 inches( 160cm) or 67 inches (170cm) is long enough
Next row: Knit all sts
Repeat this row for 9 more rows
Last row: bind off all sts
Fasten off,
weave in all ends.
Thank you all from my heart for your support watching my videos and following me on my blog !
Mary


Ομορφο!
ReplyDeleteΓεια σου Αριάδνη μου, ευχαριστώ!
Deleteμπραβοο γεια στα χερακια σου
ReplyDeleteτα θαυμαζω γιατι δεν μπορω να τα φτιαξω....εργο τεχνης καλη συνεχειααααααα
Σε ευχαριστώ Σοφία μου!!
DeleteHello! I just wish to provide a enormous thumbs up for any excellent information you have here about this post. I will be coming back to your blog post for further soon. putlockers
ReplyDeleteHi. I tried using this pattern but as written, it isn't the same.
ReplyDeleteHi Mary, this Nordic Scarf looks awesome! I’m very excited to try it out! Do you have a similar hat pattern? I think it would look great as a hat too and would be an excellent gift set for when it gets colder! Any suggestions on how to make this pattern into a hat? Thanks!
ReplyDeleteAnzelina sorry i have just read your comment!! A hat would be a great idea!! I will think about it! Maybe a worked flat pattern with a ribb pattern at the beginning.
Delete